Intermediate level arduino & circuits - 1hr
This worksheet assumes you hav arleady written the code to control the robot’s motors.
In this second stage of building our robot we’re going to allow it to avoid obstacles in front of it. We can do this with an ultrsonic detector, that works in the same way as how bats see in the dark…
An ultrasonic detector uses tiny cheeps of high-pitched sound that we humans can’t hear, but other things (like dogs, bats, and ultrasonic sensors can).
What do I need?
- Arduino code to control a robot’s wheel motors
- An Ultrasonic Sensor (HC-SR04)
- Some hookup wires & a prototype board
How do bats see in the dark?
Bats don’t have eyes that can see in the dark, but they have massive ears! They send out a little ‘peep’ travels through the air as sound (that we can’t hear as humans) and their massive ears listen out for the tiny echoes that the ‘peep’ makes as it hits the bat’s prey.
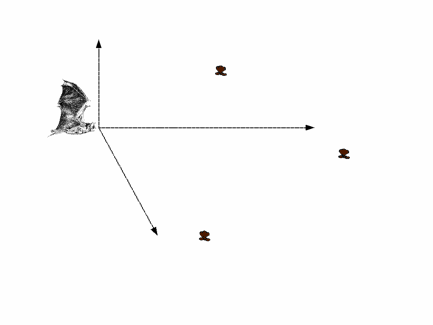
A bat’s brain does all the hard work really, so it just ‘knows’ where it’s prey is. For us though, we need to use a bit of maths!
Step One: Hookup the ultrasonic senor
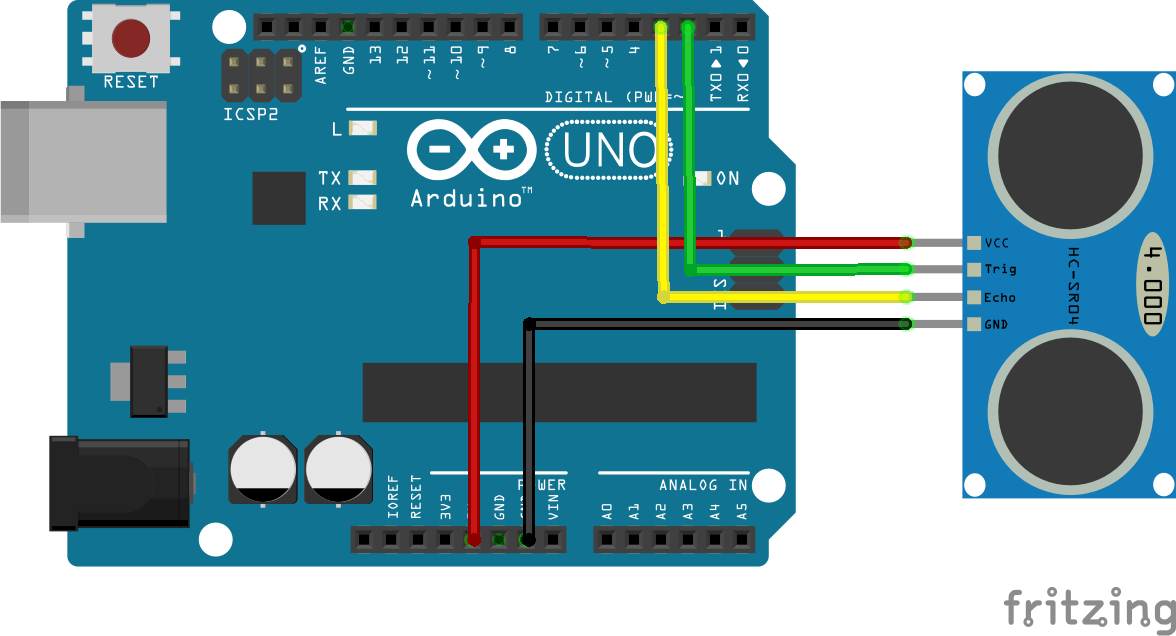
The ultrasonic sensor requires an electric current (like a light bulb, for example) and also an INPUT and an OUTPUT pin.
- Connect VCC to the 5V Arduino power pin
- GND to the GND Arduino power pin
- Echo pin should be connected to Digital PIN 3
- Trig pin should be connected to Digital PIN 2
The ultrasonic sensor works by sending a high-pitched ‘cheep’ using the Trig pin. To send it, we need to give a digital signal to this pin in the Arduino. The sensor then recieves the echo of the ‘cheep’ back on the Echo pin. The time between these two digital signal can be used by our code to determine the distance of the obstacle by using the speed of sound (you’ll learn about this in GCSE Physics!).
Use the following code to print out the distance from the sensor to the thing in front of it
Step Two: Stop the robot in a straight line before it hits something
Now we have the distance from the sensor to the nearest thing in front of it, we can use this to add some brains to our robot. At the moment our robot travels in a straight line, or in a square (if you got that far). We’d really like it to at least stop before it bumps into stuff.
We need code to…
- Measure the distance in front of the robot
- In a loop, go in a straight line if it’s clear
- If it’s not clear (there’s an obstacle, or a wall), then the robot should stop
You might need to change some of the digital PIN numbers on the original code to get the motors, encoders and ultrasonic sensor working at the same time (i.e. they can’t use the same pins as something else).
Try and code this yourself now in the Arduino code editor. The full code is at the end if you get stuck and fancy a sneaky look!
Step Three: Move in a clear direction if we stop
Horray, our robot now doesn’t bump into walls or other stuff! Now let’s take this a stage further, and make the robot move around obstacles after it gets stuck. So we need code to…
- Measure the distance in front of the robot
- In a loop, go in a straight line if it’s clear
- If it’s not clear, look in a direction (left or right).
- If the new direction is clear, continue in that direction
- If the new direction is still blocked, use the other direction
Try again to code this yourself. Does the robot now avoid stuff in a clever way?
 This arudino worksheet 'Robot: Avoiding Obstacles' from CoderDojo York is licensed under a
Creative Commons Attribution-NonCommercial 4.0 International License.
No commercial use of our material is permitted